Showing posts with label NYC. Show all posts

Saturday, 6 April 2013

Bows and Studs

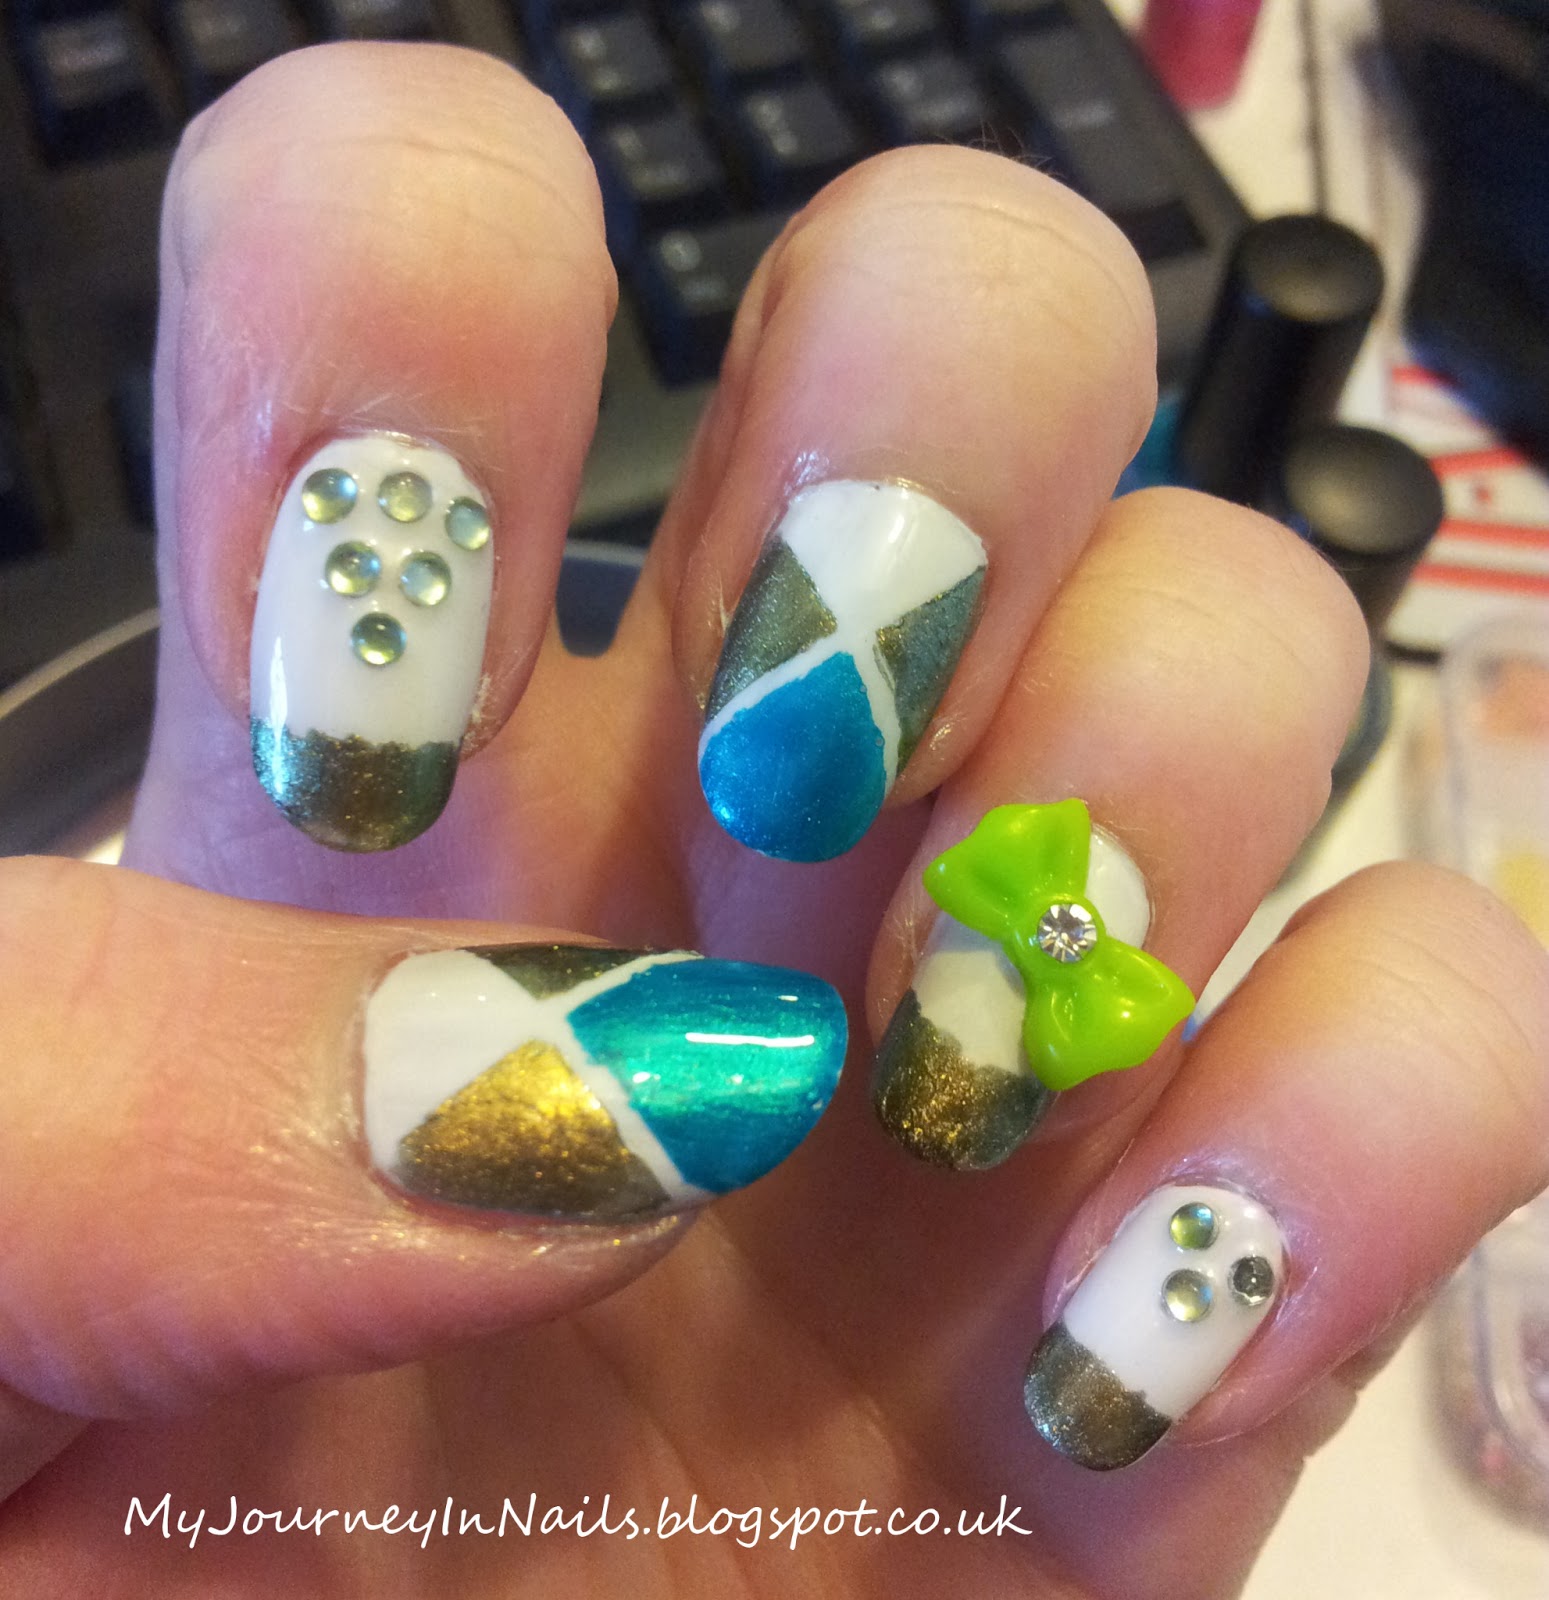
This manicure ended up something entirely different than I originally intended, but I am so pleased with the result, and think that it has actually become my favourite nail art so far. I started off intending to do the design I have on my thumbs and middle fingers on all my nails, but it was a bit too fiddly and time consuming, so I added french tips, studs and 3D bows on the remaining nails, and ended up with a really unique, eye catching design which I loved - even if the bows were slightly annoying!

What I Used -
  • Constance Carroll Base Coat and Hardener
  • NYC Pinstripe White
  • 17 Quicker Slicker Colour in Potion
  • 17 Quicker Slicker Colour in Peacock
  • NYC Topcoat in Grand Central Station
  • Nail Gems
  • 3D Acrylic Bows 
  • Nail Glue
  • Striping Tape
I started off with 2 coats of NYC in Pinstripe White, and allowing to dry completely. I then applied striping tape in a cross shape on my thumb and middle finger nails (I was going to do this on all my nails, but it was so fiddly trying to get a symmetrical cross) I filled in the 2 side triangles with 17 Potion, and the triangle on the tip with 17 Peacock - and can I just say, I LOVE this colour combination. On the remaining white fingernails, I free-handed french tips using 17 Potion again, and topcoated the lot. While the topcoat was still tacky on my index and little fingers, I arranged the nail gems in a triangle shape, to mirror the white triangle left on the other nails.Finally I used a small dab of nail glue in the center of the acrylic bows, and fixed them onto my ring finger nails. Here is the finished look -


I know there are more photos than necessary - I was just so proud of them! To begin with the acrylic bows really annoyed me, but I got used to them after a couple of hours, and wore them for 3 days before picking them off. I was sure the gems and bows would fall off of this mani, but am pleased to report that not even a single gem did in 3 days! I eventually picked the bows off, and intend to reuse them. I hope you enjoy this mani as much as I enjoyed wearing it, it is definitely a favourite of mine, and I will remember this design if a special occasion comes up!

Bye for now! S x

Wednesday, 20 March 2013

Vivid Star Showered in Glass

This post isn't as exciting as the title sounds I'm afraid! I was having trouble thinking of a title, so combined the names of the polishes I used - the glass part comes from the glass microbeads I used for my accent nails.

What I Used - 
  • Base Coat and Hardener by Constance Carroll
  • No7 Stay Perfect in Vivid Violet
  • No7 Stay Perfect in Star Shower
  • NYC In A New York Minute Top Coat in Grand Central Station no 202
  • Glass microbeads (originally bought for card making)
I started off by applying my base coat and hardener, and allowing to dry, before applying 3 coats of No7 Star Shower. When my base colour was completely dry, I used masking tape to tape off my tips, and applied 2 thin coats of No7 Miracle Mauve on the tips only. I applied a thick coat of topcoat onto my ring fingernails, before pouring my glass microbeads over the top and patting them down gently. I then sealed in the whole lot with a coat of NYC top coat - which is probably my favourite top coat now. Here is how the finished design looked -


I liked how this manicure turned out, and the effect of the microbeads (and even though I was constantly playing with them, they lasted for 3 days no problem) I think I will only be using microbeads for accent nails though, they aren't easy to remove! I love both of these No7 polishes, the Star Shower seems to have super fine glitter of all sorts of colour hiding in there!

Much love, S x

Saturday, 16 March 2013

Stripes and Sparkles

The nails I am sharing with you today, are definitely my proudest achievement to date, not least because someone asked me who did my nails! I felt quite pleased with myself that the answer was I did them.

I was super excited to try out some of the new nail art goodies I bought, and decided to have a go with the striping tape. Half way through doing these nails, I also decided to add some of my pretty gems too :).

What I Used -  
  • 17 High Gloss in Miami
  • NYC Pinstripe White 134
  • w7 Black 28
  • NYC Top Coat Grand Central Station
  • Striping tape
  • Nail gems
To achieve this look I started off by painting all of my nails pink - I later made a mistake on my left hand middle finger which had to be removed, so I painted that nail white to mix it up a bit! After the base colour was completely dry, I started applying striping tape to my nails horizontally, vertically, or diagonally, leaving each middle finger with no stripes. I then painted over the striping tape with either black or white nail polish, removing the tape immediately to get nice crisp lines - this worked on all nails except my right hand little finger, where I accidentally touched the tape back down onto the wet white polish. I then added either pink or silver gems to my middle finger and thumb nails, to form a flower shape, and then topcoated the lot. Here is the finished result -


Do you love them as much as I did? I was worried that I would pick the gems off, but they actually stayed put for 3 days, and then only came off on one nail which I re-did. I wore this manicure for about 5 days before it chipped too much, and I got many compliments :) The striping tape was quite fiddly to place, and having to wait for each coat to dry completely meant that this manicure took nearly 3 hours to achieve, so won't be a regular occurrence! However, it was definitely worth it, and I look forward to using both striping tape and the gems a lot in the future :)

My next post will likely be an epic nail fail that occurred, since I called this blog my journey in nails, it seems only right that I show you the bad as well as the good - even if I did take this one off before it was even dried, I assure you, it's not pretty!

Mwah, S x

Thursday, 14 March 2013

Stamped Metallic Skittles

Hi all, again sorry for the infrequent posts, my life has suddenly become quite busy since moving back to Devon! That and it's so difficult to motivate myself to trawl through the hundreds of photo's I've got to decide which ones to show you. I do have a couple of hours this evening though, so I have got my music on, and am getting down to the business of sorting my photo's! I have a few mani's that I am particularly excited to show you, so hopefully those will be making an appearance soon.

This manicure was an experimental one really, after I got all those new polishes I shared with you in my previous 2 posts, I was eager to see how the black and the white would stamp. I was also eager to wear ALL of the gorgeous Essie metallics too, so I have a different colour metallic polish on each finger, with some little salamanders stamped on in black and white.

What I used -    
  • Essie Blue Rhapsody
  • Essie No Place Like Chrome
  • Essie Penny Talk
  • Essie Good As Gold
  • Essie Nothing Else Metals
  • w7 Black no 28
  • NYC Pinstripe White
  • NYC Top Coat Grand Central Station no 202
  • Bundle Monster Stamping Plate BM15
And here is how the manicure turned out -


Cute huh? The white salamanders don't show up that great, purely because white isn't best suited to the base colours used, but it was still nice to stamp with :) I need to practice my stamping technique, I found it quite difficult to pick up the whole salamander, his tail was often left behind so I had to place him strategically on a couple of nails! I love all of these polishes, especially since I got them so cheap. I am looking forward to trying out stamping using the metallics too.

Until next time, S x

Friday, 1 March 2013

Shiny New Things! Part One

Hi lovely readers, I'm sorry it has taken me longer than anticipated to do this post for you, it was difficult to motivate myself to sort through and crop all my photos! There are lots :) here they are now though which is the main thing!

Today's post is to show you all the new nail polishes I couldn't resist buying last friday. I went into The Original Factory Shop, and found a load of Essie polishes at £3, as well as some other brands that I wanted to try at crazy low prices, so I ended up spending £24 and walking away with 11 new polishes! I was only looking for a white! Well worth it though :)

The first polishes I want to show you are a couple of Sally Hansen Diamond Strength polishes (only £1 each!)
The pink colour is Pink Promise 06, and the pearly colour is 17 Platinum. I tried them out by themselves, over white, and over black nail polish, and here are the results, firstly we have Pink Promise -
It is 2 coats by itself on my index finger, and one coat over one coat of white polish on my middle finger. It went on easily and is a really pretty sparkly pale pink :) not a colour I would usually choose to wear by itself but I thought it might look nice over other colours, as it does have a very fine glittery finish. Here it is over black nail polish -
The pretty glitter is more obvious over a darker colour :) Next we have the Platinum both by itself and over white -
The ring finger is one coat by itself, and the little finger has one coat over white. Excuse the messy cuticles, I was just experimenting with what the colours looked like! Here is how the platinum looked over black -
As you can see, it does have some quite heavy pink tones in its finish. I'm not sure how much I like this polish, I didn't think it would be quite so opaque, I had hoped that I may be able to use it as a pearlescent topcoat, but it would just take over the whole look. I'll think of something I'm sure!

The white used above was also a new one, by a brand I haven't used before, NYC -
I bought NYC Pinstripe White 132, and a fast dry top coat which is called Grand Central Station 202, and I have to say I am so impressed with both of these since the brand is a relatively cheap one anyway, and these were even cheaper at £1 a bottle. The white has a smooth, streak free finish in 2 coats, and I have since used it successfully for stamping and with striping tape. The top coat does just what it's meant to, providing a smooth glossy finish.

Another brand that is new to me is w7, I bought their Black 28, as one of my blacks is on its way out, and one of my favourite bloggers uses w7 polishes quite a bit in her designs, so I figured it must be good! This one was £2 for a 15ml bottle -
Again, I am very impressed with this polish, it gives a good finish with just one coat, is easy to apply, and as with the NYC white, I have successfully used it for stamping and with striping tape, so all good :) It may have just become my go to black since my Rimmel Black Cab is nearly gone!

I am starting to realise what an epic long post this would be if I included the 6 Essie polishes I bought as well, so I shall save those for next time, in part 2 :) I also have some nail art to show you soon, as well as even more shiny new goodies, yey!

Blog you soon, S x