I filed my nails into a shape I was happy with whilst watching TV with my boyfriend. I used A Boots own brand emery board, which worked just fine (though I have noticed that even a little splash of moisture makes these unusable). My natural nails aren't in bad condition, my index finger on my right (dominant) hand has recently broken, but the rest are good, although some of them grow square and some grow rounded so I always have trouble deciding on how best to shape them!
Here is a photo of all I used to achieve this look, I will describe the items and how I used them throughout the rest of this post.
- No7 Stay Perfect Nail Colour in 100, Temptress
- 17 High Gloss Nail Polish in Miami
- A standard household sponge/scourer
- No7 Stay Perfect Top Coat
- Sainsburies nail polish remover with a cotton bud.
I like this colour, it does have a bit more of a reddish tinge to it than these pictures show too, and I enjoy wearing it with just a lick of topcoat applied. However, I felt like experimenting with one of the techniques I have come across whilst browsing countless other nail-related blogs, so had a little go at sponging on a contrasting colour.
I cut the corner off of a normal sponge-scourer we use for washing up (I included the scourer part to experiment with the different texture, but it didn't work as well as the sponge part did) and used this to apply the contrasting colour. The colour I decided on was 17 High Gloss Nail Polish in Miami, I thought that this colour would be striking enough to stand over the very dark temptress polish. Usually the lighter colour is applied first and the colour that is sponged on is darker, but I did it backwards just to see what would happen :).
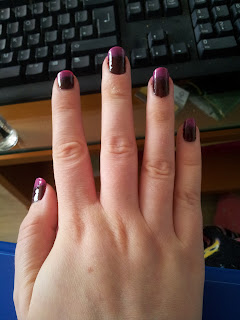
I used the nail polishes own brush to paint some colour onto the sponge, and then dabbed the sponge accross the tips of each nail, and slightly up the nail for a bit of a gradient in colour. I allowed the first layer of sponging to dry before applying a second layer just on the tips to make the colour a little more opaque. I then simply applied a lick of top coat (No7 Stay Perfect Top Coat - only one layer required) used a cotton bud dipped in Sainsburies nail varnish remover the clean up the edges (sponging is a little messy) And photographed the end result for you folks to see :) and here is how they turned out:
I am actually really happy with how these turned out, considering how simple they were to achieve. Excuse the slightly messy edges, I did the best I could with a cotton bud, if I had a fine brush I would have used that dipped in remover to make the edges more crisp. I don't know how long these nails will last with this non-professional nail polish, but hey ho, the quicker they chip, the sooner I will have an excuse to try something else out!
Bye for now, S x


No comments:
Post a Comment